For some reason, most KitchenAid freezers eventually run into a similar problem of simply not freezing. There are countless cases of KitchenAid owners who say they’ve had this problem.
Here’s the good news – after working on used appliances for over a decade now, I can tell you that around 80% of all KitchenAid freezers that won’t freeze are relatively easy to fix.
If you try each and every one of these solutions, I am extremely confident one of them will work for you. For most of these fixes, you only need a screwdriver!
KitchenAid Freezer Not Freezing
If your KitchenAid freezer is not freezing, it’s because the condenser coil in the back is dirty and needs to be cleaned. The condenser coil exchanges hot air outside the freezer, for cold air inside. If it is obstructed in any way your freezer will not freeze properly.
But before you start taking your freezer apart, I want you to check a few “obvious” things for me.
NOTE: I will refer to your appliance as a “freezer”, but in most cases it will be a refrigerator/freezer combination. But even if your appliance is strictly a freezer, all of the advice and instruction below still applies.
Unplug freezer and check power outlet
First, unplug your freezer and try plugging something else into the same outlet. Just make sure that outlet is working. If it’s not, go to your circuit breaker box and see if the circuit is tripped.
If the outlet is working, go ahead and keep your freezer unplugged for 2 full minutes before plugging it back in.
This will reset your freezer and may just fix your freezing issue.
Oh, and while you’re back there, make sure there is at least 1 inch of clearance between the wall and the back of your freezer. This allows for proper ventilation!

Check temperature control settings
Ok next. I know this also sounds incredibly obvious, but just triple check that your temperature control settings are correct.
You wouldn’t believe how many times I “fixed” a KitchenAid freezer that wasn’t freezing by simply turning the temperature control settings down.
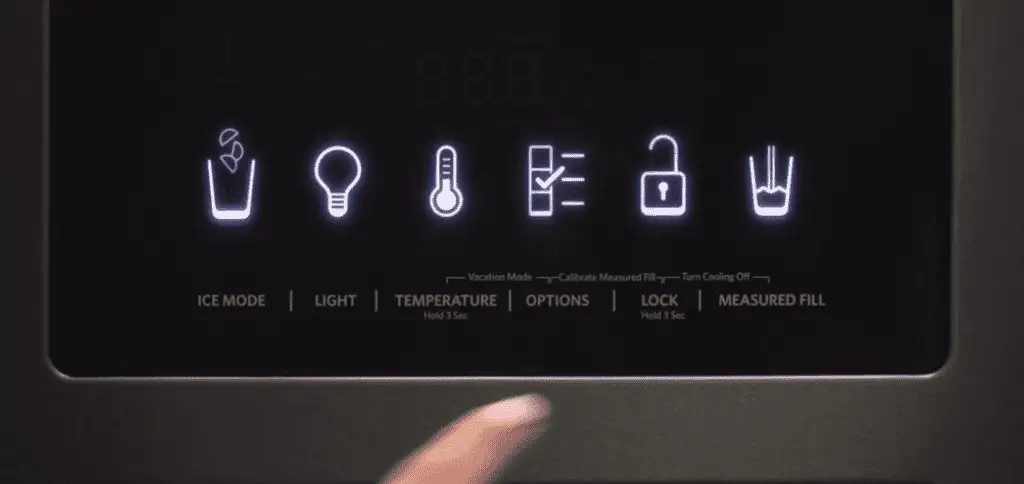
Sometimes these settings get changed accidentally, or a kid plays with them. But ultimately if the temperature is set too high, your freezer simply will not freeze properly.
There are several different types of temperature controls depending on the KitchenAid model refrigerator you own. All of them are fairly straightforward to adjust.
Check refrigerator and freezer doors
One last seemingly obvious thing before we jump in.
Make sure that both the refrigerator and freezer doors are not obstructed in any way, and that they are able to close fully. Sometimes large containers, or trays can prevent the doors from closing.
While you’re checking this, take a look at the door gaskets that help provide a seal, and prevent any air from escaping.

If you see a gasket that appears to be separating from the door, simply use your hand to press it back into place.
Check and clean condenser coils
Ok, now that you’ve confirmed your outlet works, the temperature settings are correct, and that the doors are closing properly, go ahead and unplug your freezer and pull it out and away from the wall.
Just keep in mind that you will need to eventually power on the freezer again for some of the troubleshooting steps later on!
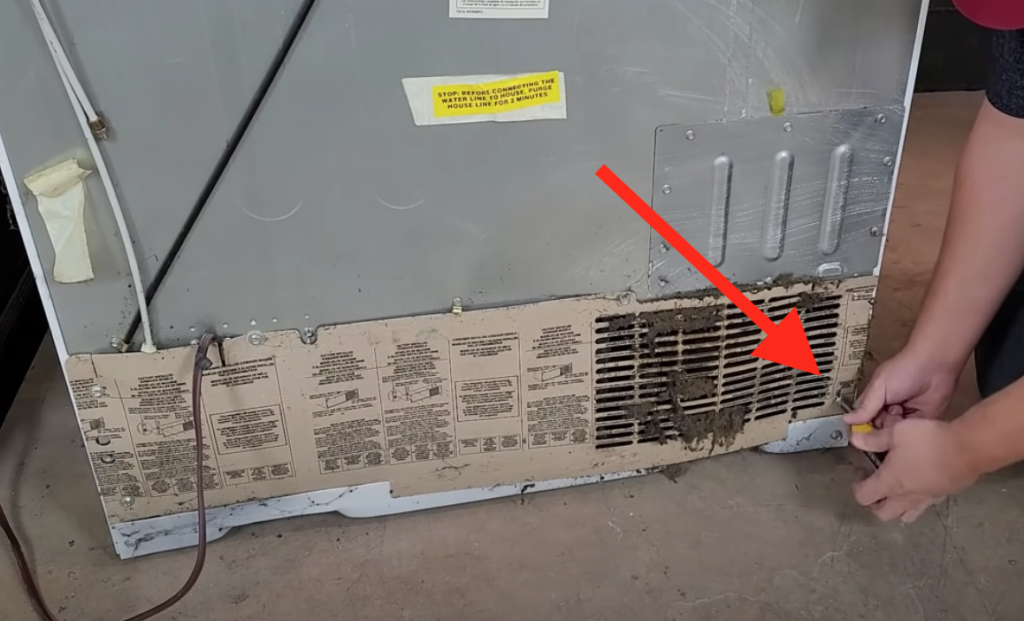
With your freezer unplugged and pulled out, go ahead and check the vent at the back. You want to make sure there are no obvious physical obstructions blocking this vent.

This vent pulls fresh air in to cool down the freezer’s condenser system. Over time, it can pull in dust and debris that block the vent altogether. Often, when your freezer isn’t freezing, this is the issue.
Now that you’ve cleaned up the vent, go ahead and take off the back vent plate entirely. Remove each screw until it’s fully off.
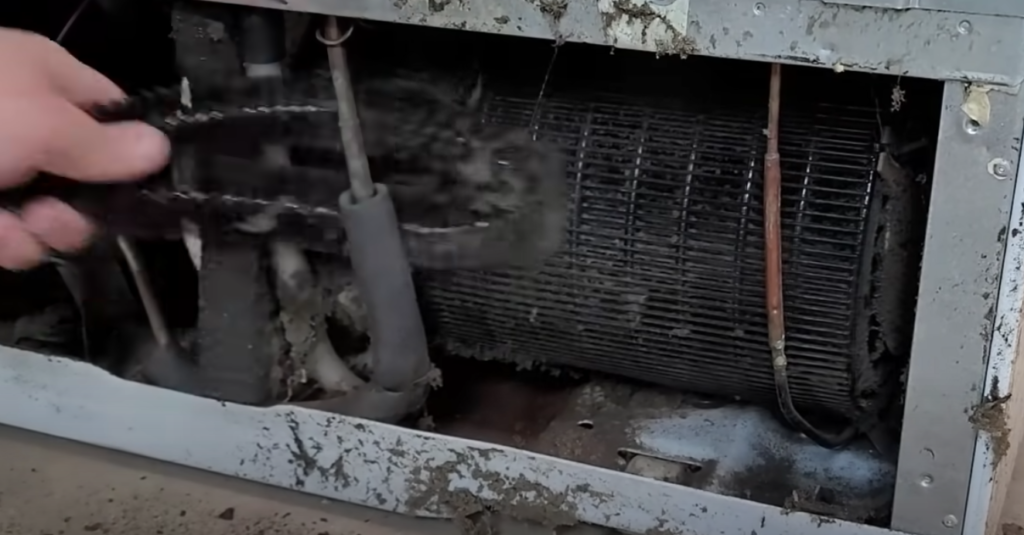
Removing the vent plate will expose the condenser coil. The condenser coil exchanges heat outside the freezer, for cold air inside. If your condenser coil looks anything like the one below, it needs a deep clean!
Obstructed condenser coils cause your freezer to not freeze properly. You may still get a little bit of cold air, but not much.
To clean the condenser coil, you’ll want to use a condenser brush and a vacuum cleaner. The condenser brush makes the job a lot easier, but if you don’t have one you can try using a brush of a different kind.
Make sure to get all the dust and dirt off the condenser coil, and vacuum up the debris as you go.
Keeping the condenser coil clean will ensure your freezer can properly exchange the hot air for cold.
One additional thing to keep in mind: depending on the KitchenAid refrigerator/freezer model you own, the condenser coils may be entirely on the back, or they may run to the front of the refrigerator/freezer as well (underneath the kick-plate).

If that’s the case, make sure to clean and vacuum out the front as well.
After you’ve cleaned everything up, go ahead and plug your freezer back in. Hopefully it’s freezing now!
It’s a good idea to do this type of cleaning every 6 months or so going forward.
Check the condenser fan
If you cleared the vent and cleaned off the condenser coils, and your KitchenAid freezer is still not freezing, it’s time to do a bit more investigating.
Let’s start by looking at the condenser fan.
The condenser fan is typically located between the compressor and the condenser coils. Its job is to keep fresh air circulating, cooling off the coils and the compressor.
If this fan stops working, it can have the same effect on your freezer as the dirty coils – it will prevent the freezer from freezing properly!
Take a good look at this fan and make sure it is clean and running well. If you see damage or extreme rusting, then it needs to be replaced.

When your refrigerator/freezer is plugged in, this fan should come on automatically, and stay on at all times. If it doesn’t, this is likely the culprit.
Check the compressor relay
Next, you’ll want to check the compressor relay.
With the freezer on, touch and feel the compressor to see if it is running. It has a motor inside the unit that runs to freeze the freezer.
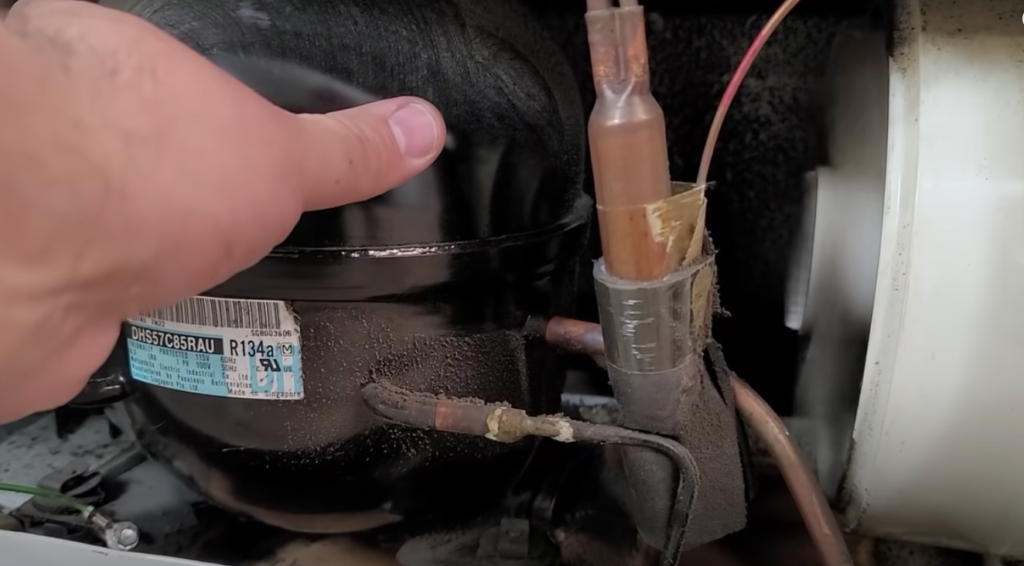
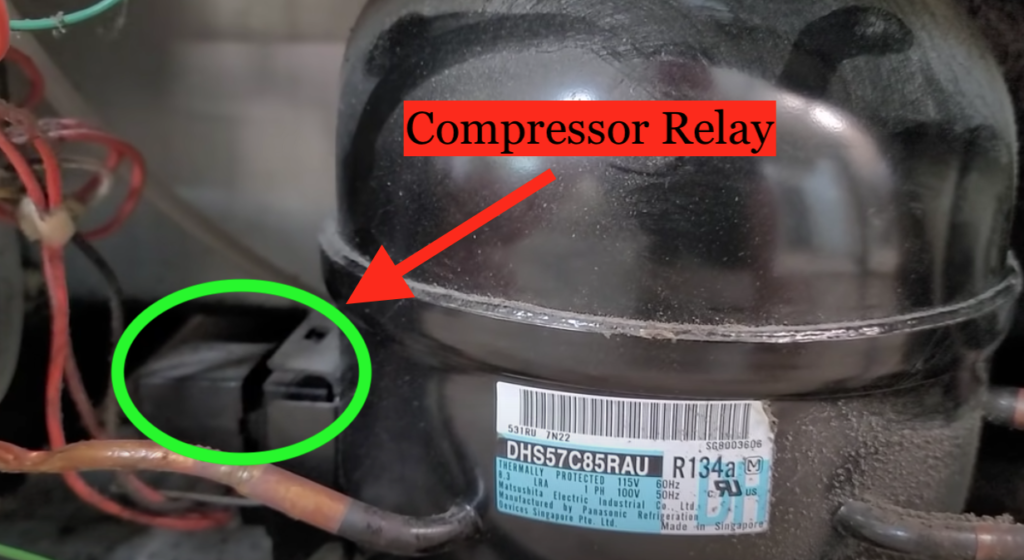
If you don’t feel any movement, or hear any buzzing of any kind, it’s very likely that the piece to the left, the compressor relay, is broken.
The compressor start relay provides power to the compressor. It determines when the compressor is on, and when it’s off.
To check if it’s broken, unplug your freezer and then plug it back in. Listen closely to the compressor. If you hear the compressor “click on”, and then quickly “click off”, it’s likely that you have a bad relay.
Next, go ahead and unplug your freezer, and then unplug and remove the relay. Once the relay is off, go ahead and give it a shake.
If you hear a lot of rattling, it’s likely the relay is bad. If small particles fall out as you shake it, it’s definitely bad!
As a final test, you can use a multimeter to check for continuity.
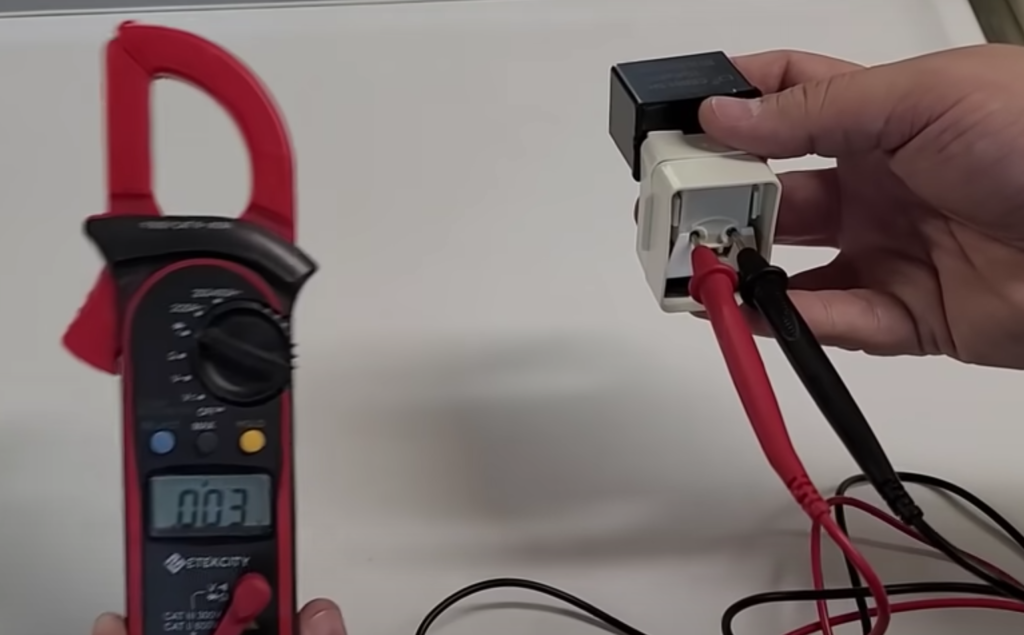
If you don’t get a reading, the contacts have been destroyed and you will need a new relay.
Check the evaporator
Ok, at this point we’ve checked everything we need to on the back of your appliance. If your KitchenAid freezer is not freezing still, it’s time to start investigating the front.
The evaporator, located in your freezer, is what makes your freezer cold.
If you have a refrigerator/freezer, a fan blows the cold air generated in the freezer by the evaporator, into the refrigerator portion of the appliance as well (unless it’s a dual evaporator refrigerator/freezer).
Let’s see if your evaporator is the problem.
Start by making sure your freezer is unplugged and then open up the freezer.
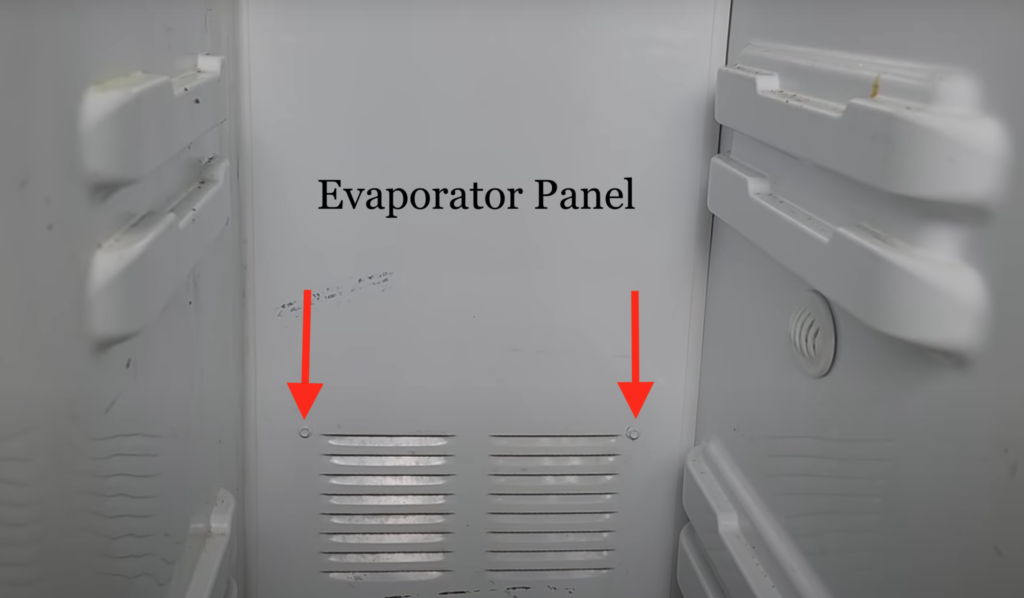
Remove all the shelves in your freezer, followed by all the screws that secure the evaporator panel to the back of the freezer. This panel covers up the evaporator coils.
These evaporator coils are responsible for cooling the whole system down.
If you discover a lot of snow/ice build up on the back of the panel and/or on the evaporator coils themselves, you’ll want to inspect the defrost thermostat at the top of the evaporator coils.
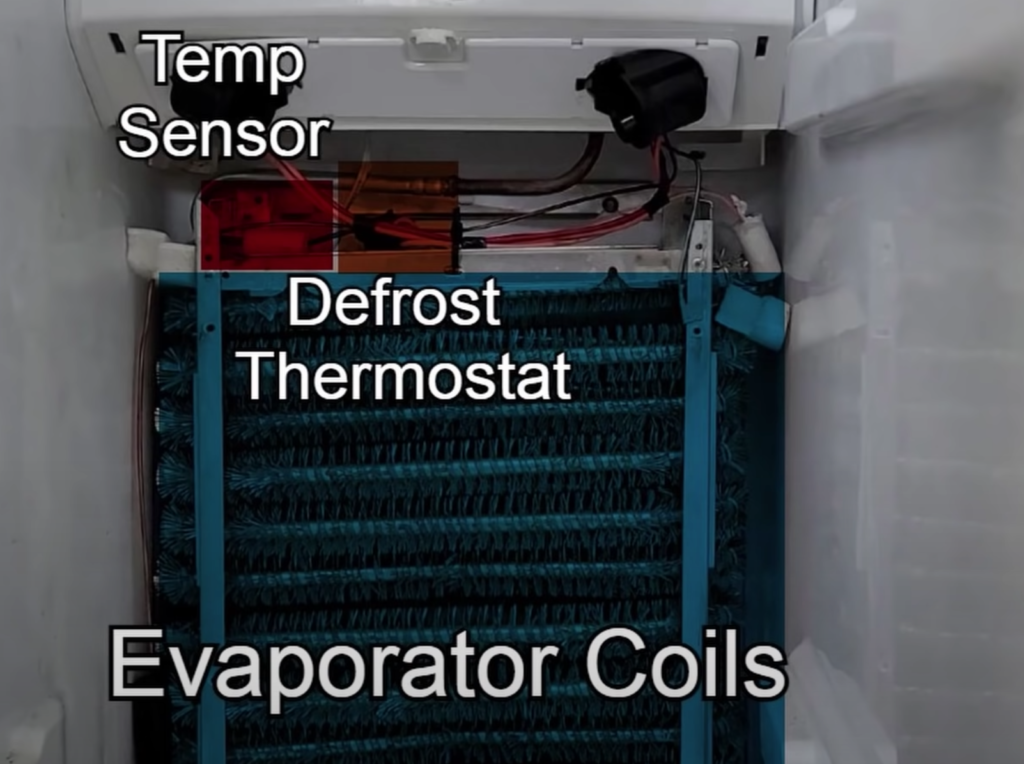
Here is a closer view of the defrost thermostat, as it can be a bit hidden on these types of freezers!

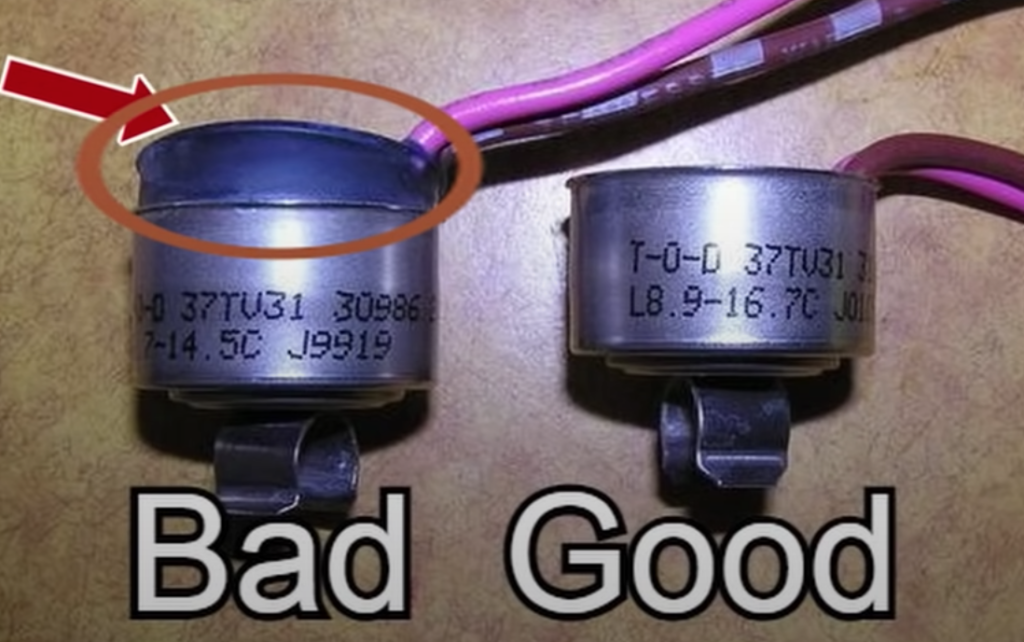
If the lid of the thermostat is swollen, then your defrost thermostat is bad and needs to be replaced.
If you don’t see anything visually wrong with the thermostat, you can test it for continuity while the thermostat is under 30 degrees. This is pretty tricky to do however, so you’ll probably want to call a technician to help.
Assuming your thermostat is fine, the next thing to check is the defrost heater.
Underneath the evaporator coils, at the bottom of the freezer, you’ll find the defrost heater. The defrost heater turns on every few hours to thaw out the ice that builds up on the coils.
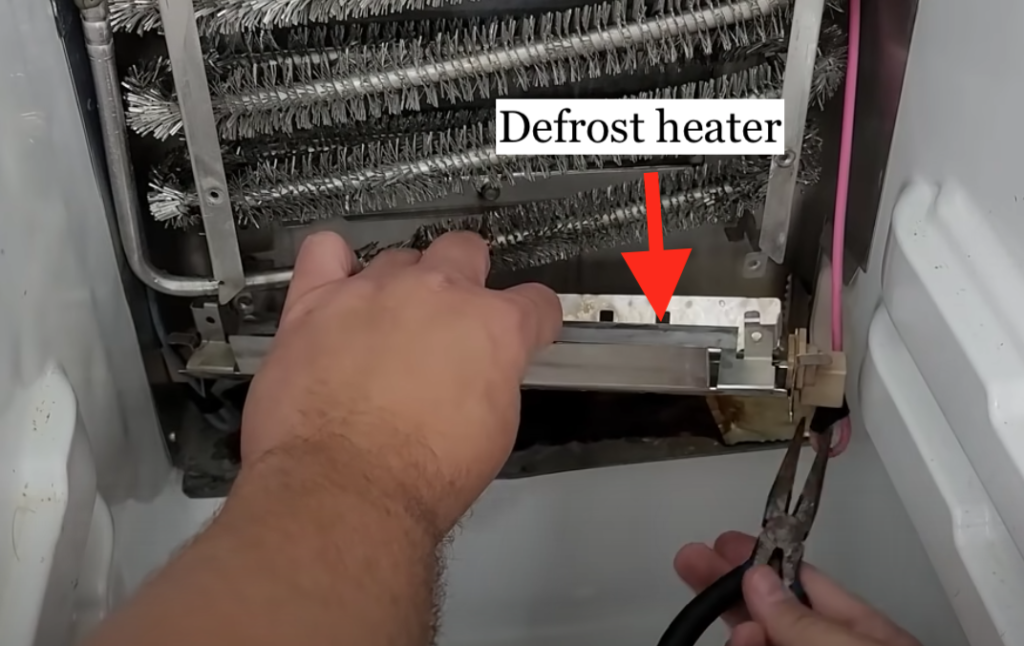
If the defrost heater isn’t working, your coils will turn into a solid block of ice, and stay that way!
For some models of KitchenAid freezers, these are especially difficult to test while still attached, so I recommend removing it entirely.
Once it’s removed, use your multimeter set to Ohms resistance (or continuity) and see if you can get an electrical signal.
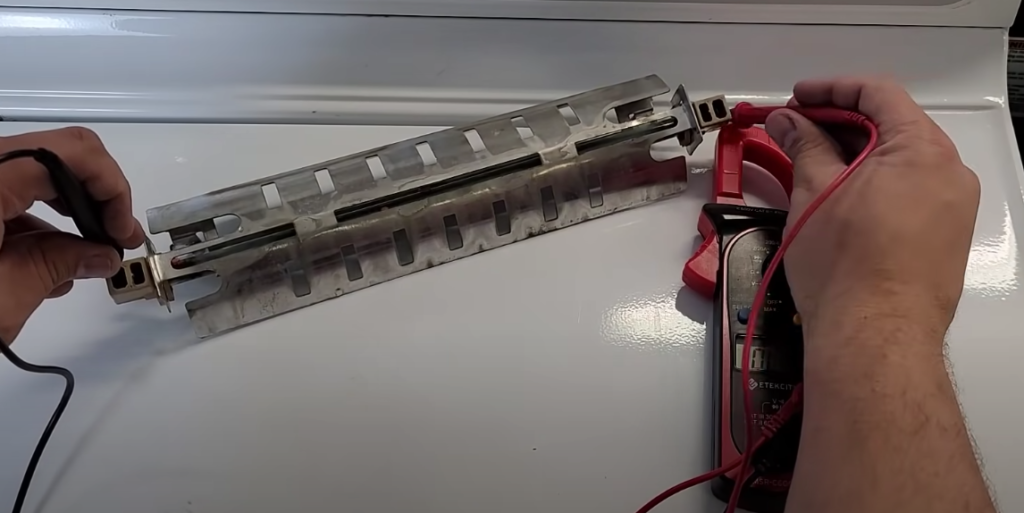
If it’s working, you should be able to get a signal between 20-40 Ohms.
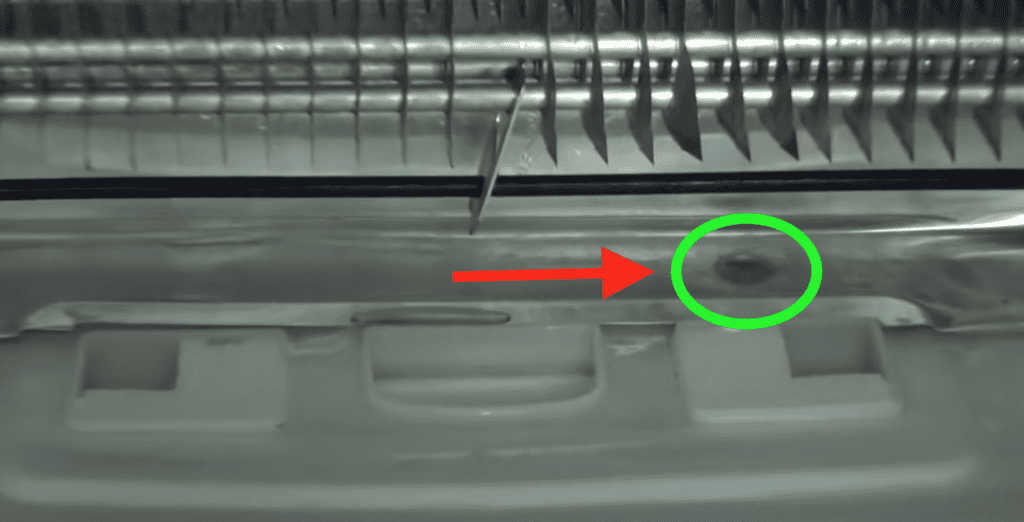
On some newer freezers, the evaporator system will more closely resemble the photo below. The parts may look slightly different, but all the components are the same.
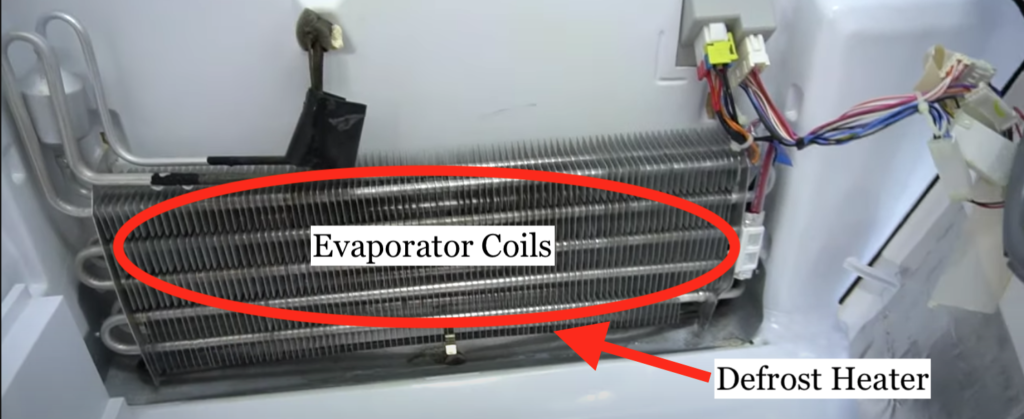
For example, the defrost heater in this newer refrigerator/freezer is the difficult to see, black cord running horizontally along the bottom side of the evaporator coils in the back.
So, in summary, if you find a lot of snow/ice back here, you’ll want to let everything fully thaw out. After you let the ice melt, plug your freezer back in and see if your freezer is able to freeze again.
If it still won’t freeze, it’s possible your defrost heater, defrost thermostat and/or freezer temp sensor need to be replaced!
Check the defrost timer
Another possible cause for snow/ice build on the evaporator coils is a broken defrost timer.
The defrost timer controls the defrost cycle of your refrigerator/freezer, cycling back and forth between cooling and defrosting modes.
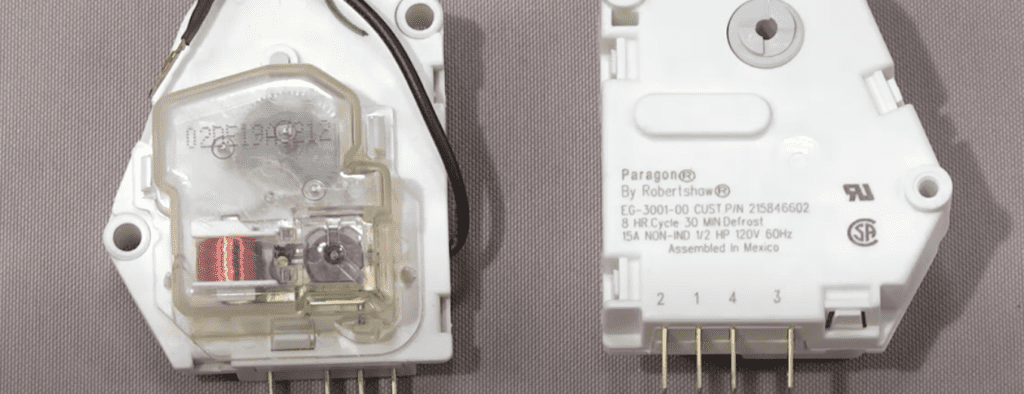
The timer itself is made up of motors, gears and contacts. It communicates with the control board, which turns off the compressor and turns on the defrost heater at a set time interval.
For example, many defrost timers have an 8 hour cooling cycle, followed by a 30 min defrost cycle.
You’ll typically find this timer mounted in the control section of the refrigerator, or on older models, behind kick panel in the front of your appliance.
In rare instances, you’ll find the timer at the back of the freezer.
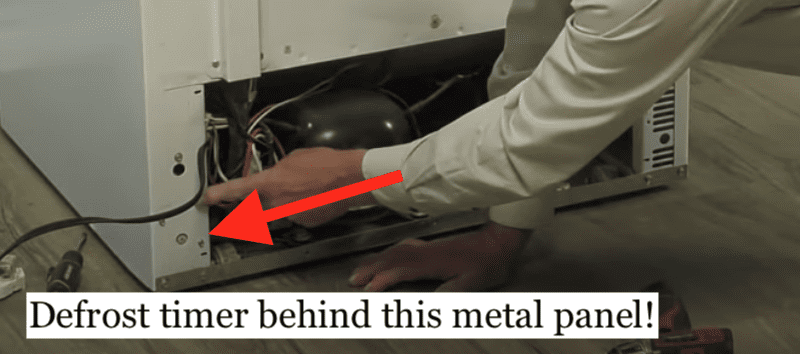
If your freezer is not freezing, it very well could be because this timer has failed.
To test the timer, use a flathead screwdriver and manually advance it until you hear a loud “click”. This means it is now in “defrost mode”. You should hear the compressor shut off, and the defrost heater turn on.

If that doesn’t happen, you’ll need to replace the defrost timer.
Check the evaporator fan
If you’ve made it this far and your KitchenAid freezer is still not freezing, it’s time to check on the evaporator fan.
The evaporator fan controls airflow from the evaporator coils, and then circulates it throughout the freezer and/or refrigerator. If it’s not running, your freezer may get chilly, but certainly not cold.
The quickest way to inspect it is to simply listen for it.
To get a closer look, on the freezer side, you can remove the light mountings and then look up through the casing to see whether or not the evaporator fan is running.

To get an even better look at the fan, you’ll have to spend a bit more time getting the entire system out. This isn’t complicated, but it does take a bit of patience.
Once you’ve exposed the fan, see if it turns on. If it doesn’t, there are usually two reasons:
- An obstruction (such as ice build up)
- Or the fan has failed
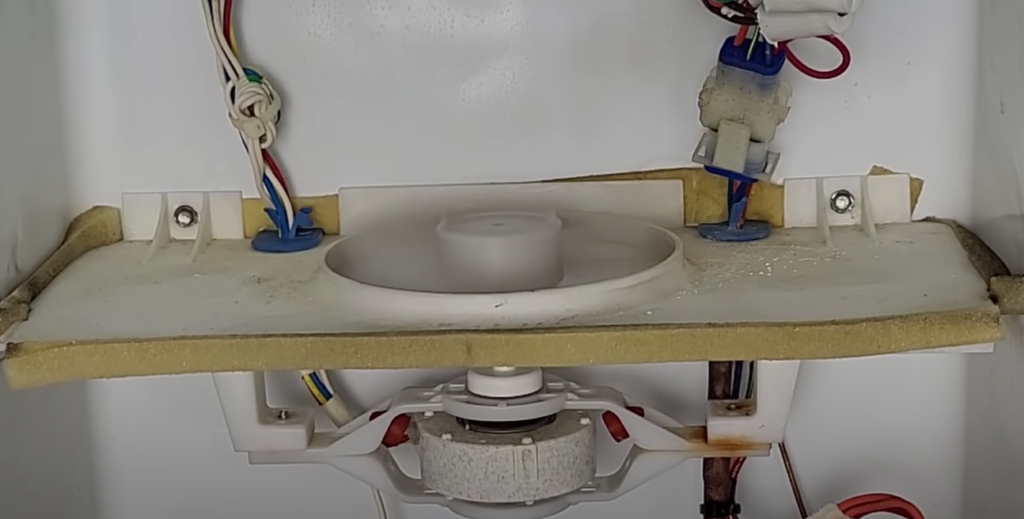
On some newer freezers, the evaporator fan will more closely resemble the photo below. The fan will be attached to the evaporator panel itself.

If the fan has failed, check to see if the door switch is helping the fan to start and stop properly. The door switch is pressed in when the door is closed (it also turns the light on and off).
Just press the switch in with your hand to simulate a closed door. The evaporator fan should come on shortly after.
You can also use your multimeter to see if the fan is getting the proper 8-14 Volts of DC power it needs to run.
If it’s failing to get the proper voltage, the control board itself may be bad.
Check the defrost drain
By now you know that your freezer has evaporator coils that serve to cool down your appliance. And every so often these coils are defrosted to prevent permanent ice build up.
When evaporator coils are defrosted, water is produced.
This water is suppose to drain into your freezer’s defrost drain. But occasionally the defrost drain beneath your freezer’s evaporator coils get clogged.
When this happens the excess water freezes over during the next “frost cycle”, and the defrost heater is not capable of melting the additional ice.
Somewhat counterintuitively, if your KitchenAid freezer is to not freezing properly, it is likely caused by all this excess ice.
To fix this issue, I recommend you let your freezer thaw out and then force air through the drain to unblock it. It’s possible some debris built up in the drain overtime. Alternatively, you can use a turkey baster to blast water down the drain.
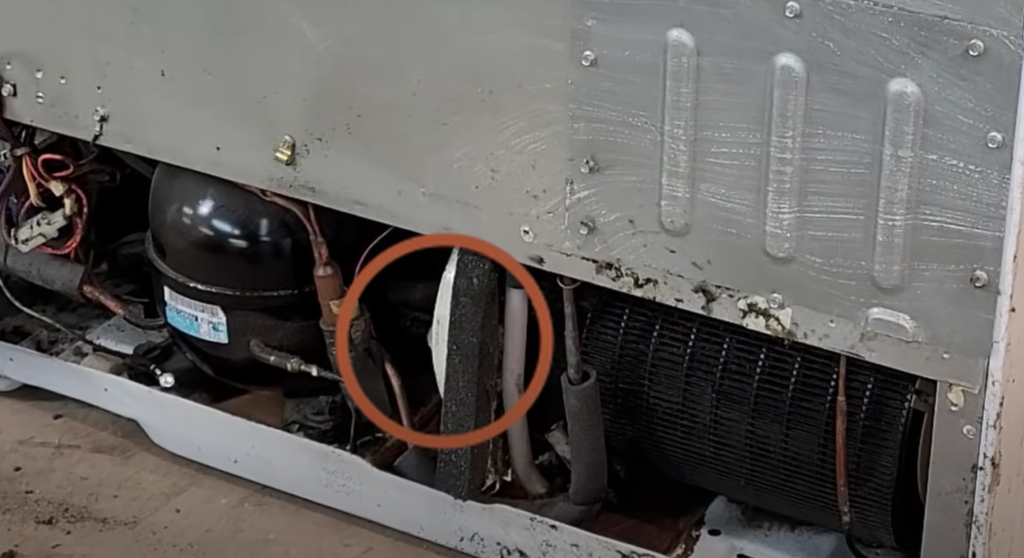
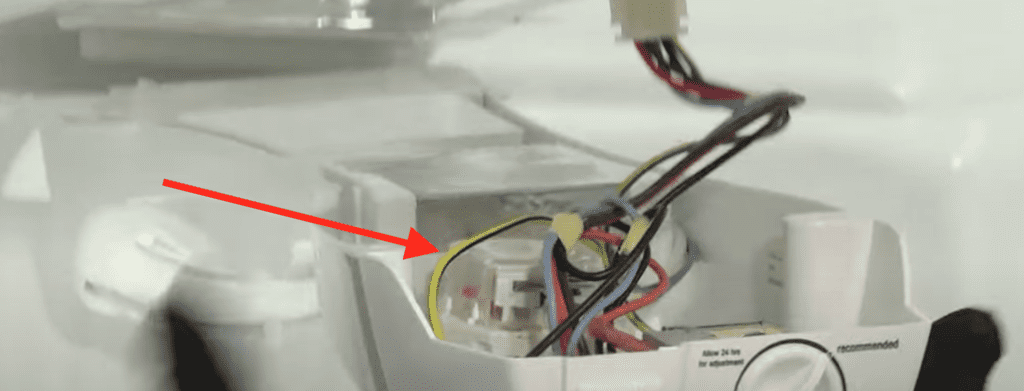
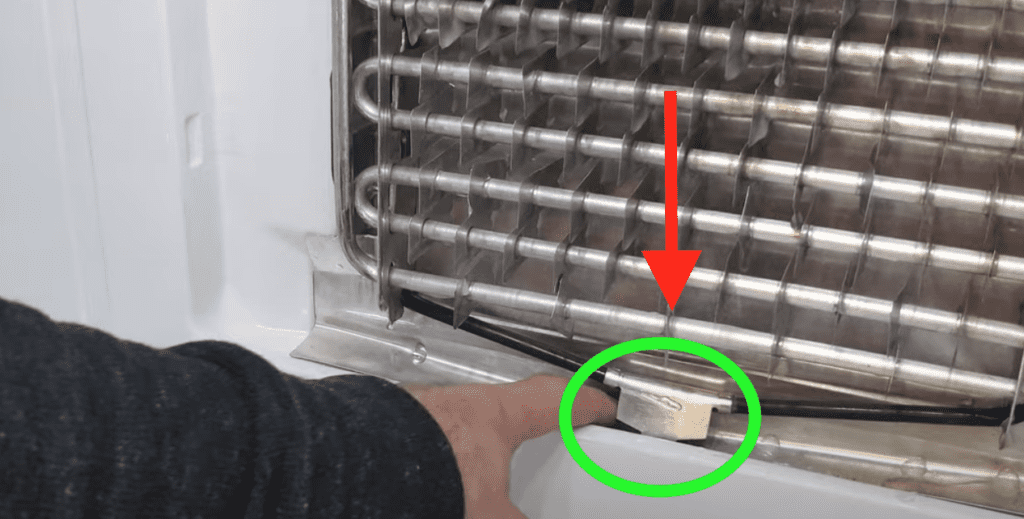
You can find the defrost drain in the freezer, just below the evaporator coils.
Depending on your exact model, the defrost drain might look like the one below instead. The aluminum piece you see circled is connected to the defrost heater and goes directly down into the drain.
The aluminum heats up and helps keep the defrost drain from completely freezing over. That’s the idea at least.
How to order KitchenAid freezer replacement parts
Hopefully you were able to discover exactly what’s causing your KitchenAid freezer to not freeze properly.
If you found a bad or defective part, you’ll need to replace it.
Start by opening up your refrigerator door and looking on the side wall. You should see a sticker with all the details regarding your appliance.
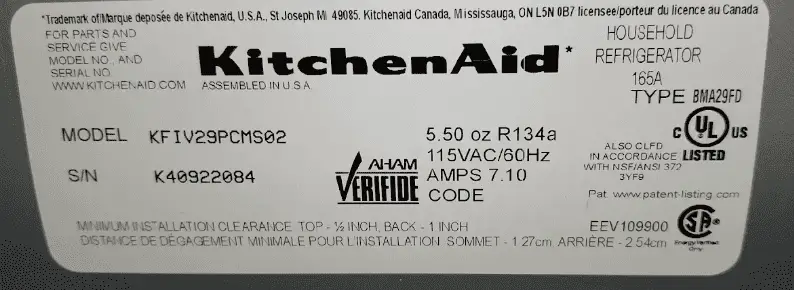
You’ll want to take down the exact model number of your freezer.
Finally, type that model number into Sears Parts Direct and locate the exact part you need.
KitchenAid freezer user manual
Now that you have your KitchenAid freezer model number, you can type it into the search bar of KitchenAid.com and pull up the user manual from your freezer.
The user manual will likely have some additional, model specific troubleshooting steps you can try in addition to what I’ve described here.
KitchenAid support
If your KitchenAid freezer is still not freezing, you’re likely looking at a bad control board, broken compressor, or a sensor that has failed somewhere in your appliance.
Unfortunately, these types of fixes typically require a trained professional. I’d start by contacting KitchenAid support.
You can reach them at 1 (800) 422-1230.
- Mon–Fri: 8 a.m. to 6 p.m. EST.
You can also schedule time online for a certified service technician to come directly to you. In some cases, your warranty will cover the entire cost!
Conclusion
If your KitchenAid freezer is not freezing, here’s how to fix it:
- Confirm that the power outlet is working
- Unplug freezer for 2 minutes before plugging back
- Lower the freezer temperature setting
- Check that the refrigerator and freezer doors are closing fully
- Clean off the condenser vent and coils
- Make sure the condenser fan is working
- Check if the compressor relay failed
- Confirm that the defrost heater is working
- Make sure the defrost thermostat is working
- Confirm the defrost timer is working
- Check if the evaporator fan is working
- Unclog the defrost drain
Once you discover the faulty part, simply order a replacement.
If none of these fixes work, your best bet is to hire a certified technician to come and take a look.